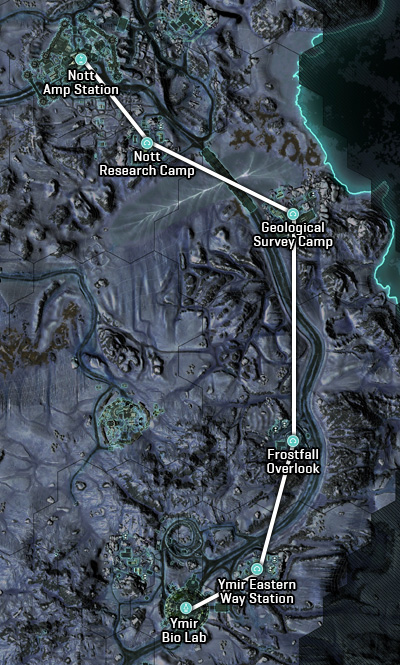
Esamir Match Lane
The Esamir lane runs between Nott Amp Station across the eastern lattice towards Ymir Bio Lab. This lattice, more than any other, is one that requires speed and a large amount of teamwork on the parts of each outfit. Leap-frogging is paramount here. Leap-frogging is the idea that you can send forces to the next base in the hopes that you have enough numbers to defend, thus leap-frogging your opponent, effectively forcing them back to defend rather then attack. Through aggression, timing and proper calls from the Platoon leader the middle bases on Esamir can provide very intense vehicle and infantry attacks and counter-attacks.
Nott Amp Station (5pts + Round End)
The most difficult base to take on the Esamir Lattice. Outfits have rushed the point with Gate Diffuser Sunderers, but without local spawns, attackers are at a disadvantage. This base, more than any other on the lattice, requires the most well rounded teamwork and smart tactical calls from the Platoon leader. To get an absolute victory attacking Nott Amp Station will require the absolute best from attacking outfits.
Nott Research Camp (2pts)
The most notable characteristics of attacking Nott Research Camp is the long bridge and the steep incline towards a viable Sunderer position. High walls and a teleporter room allow access to the two double stacks that fill the interior of the base. If the defenders can maintain air superiority then retaking the base and pushing forward is a matter of destroying an exposed Sunderer and taking advantage of the close proximity of the spawn room to the point.
Geological Survey Camp (2pts)
This base, more than any other on the Esamir lattice is most punishing to defenders if they're unable to control the air. With two routes to the point – one, an open field run and the other, a trek across a covered bridge, provides little cover for defenders once they've lost air superiority. Many outfits have struggled to counter air pressure properly enough to defend the base. Geological can be an incredibly frustrating experience to outfits that aren't properly prepared to deal with threats from the sky.
Frostfall Overlook (2pts)
This base, alongside Geological Survey Camp is midfield for the Esamir lattice. The start of the match will be defined by which outfit can be the quickest to get people on point. Typical outfit starts will begin with racer ESF's to get people on point, followed by Liberator's and a Galaxy. The distance between Frostfall and Geological is lined by a long road, which allows for the most pitched vehicle engagements on the lattice. A key structure to note on Frostfall is the double-stack building near the point. If the attacker can control that and put pressure on defenders spawning, they can burn plenty of time on the capture timer.
Ymir Eastern Way Station (2pts)
The Thermopylae of the Esamir lattice. This base only has one entrance, to the south, making it difficult for attackers to setup Sunderers. Aggressive tactics, smart beacon and medic play combined with pressure on the point can buy time for attackers to setup enough pressure on the defenders that they can get a spawn advantage, but it is highly dependent on air dominance.
Ymir Bio Lab (5pts + Round End)
The interesting thing about Ymir Bio Lab isn't the base, but the adjacent hex leading to it – Ymir Eastern Way Station. The best way to defend Ymir Bio Lab is to defend the Eastern Way Station. Since only one hex can be captured, all of the pressure from the attackers on the Bio Lab are restricted to the northern areas of the base – the vehicle pad and teleporter. Defending the Bio Lab is more an effort in defending the adjacent hex, than holding up inside for an Alamo.
Base & Lane analysis by KidRiot
PlanetSide® 2 ©2014 Sony Online Entertainment LLC. SOE, the SOE logo and PlanetSide are registered trademarks of Sony Online Entertainment LLC
SOE® SOE and the SOE logo are registered trademarks of Sony Online Entertainment LLC. All rights reserved.
Site design
©2014 PS2 Community Clash - Design by Frazer Davies